Widgets
Information and Usage
Widgets are visible and interactive elements that can go on your webpage, such as a collection of buttons or a script that allows you to build a game. Out of the three categories on this page (themes, widgets, and plugins) they require the most input from you to install correctly, since they are usually very complex. Every widget includes an installation guide however, so code can easily be copied or edited with the guide if you're not confident in your coding abilities.
Free Widgets
⧉ Artist's Portfolio V1.0
Download: Complete .ZIP file
A widget that creates a gallery of images for artists, photographers, and other image-focused users. It includes sorting options, scheduling, preview images, and more.
Features- Automatic, customisable, gallery grid
- Image viewer with keyboard accessibility
- Tag filtering
- Chronological and alphabetical sorting
- Search images added before, on, and after set dates
- Search images by title, description, and ALT
- Easy to add image ALT
- Option to add more information and images to each picture in the gallery
- Option to add dates to images, such as when they were made or added
- Option to hide images that have a date set in the future
- Optional preview images in the gallery grid to reduce load times
- Option to add an external link to your image's information
- Show collections of tagged images
- Last Updated: 14th January 2024
- Item Name: sc_apw
- Status: Complete
- Type: Widget
- Javascript: Required, noscript warning
- Files Included: HTML file, Javascript file, CSS files (8), placeholder images (7.9MB)
- Other Scripts Included: No
- Example: Example HTML page
The widget comes with an installation guide shown through gallery images, you can view it here.
📰 Blog Pages Widget V1.01
Download: Complete .ZIP file
This widget helps automate a lot of the blog-making process for personal sites, making it far easier to post updates on your website and set up a RSS feed. It also adds more functionality with chronological sorting, labels for filtering, and post scheduling.
Features- An interactive post list that automatically generates based on the URLs you provide
- Timestamps included on post links and posts, which can be customised
- A label system that can be used to search through blog posts, by excluding or including posts with those labels
- The ability to limit how many post links show at once, which adds a 'view more posts' button
- An added button to return to your homepage and to link to your RSS feed, and the option to hide them
- The ability to schedule posts, which hides them from the post list and redirects users who try to open the post manually
- Automatic addition of a post's title, time posted, and labels
- Automatic addition of buttons to posts that link to the post before, and after, it.
- Last Updated: 4th January 2024
Update Notes
4th January 2024
- Added patch to .js file to ensure ".html" is added to new and old post links while viewing another post.
- Edited the 'Text Full' CSS file to have a minimum height, so tags don't vanish if no posts appear.
- Item Name: sc_bpw
- Status: Complete
- Type: Widget
- Javascript: Required, noscript warning
- Files Included: HTML files (8), Javascript file, CSS file, placeholder images
- Other Scripts Included: No
- Example: Example HTML page || CSS Viewer
The widget comes with an installation guide as a blog post, you can view it here.
🖼 Interactive Map Widget V1.0
Download: Complete .ZIP file
A widget that helps users set up an interactive image map. The map offers hover-on features to change its appearance, being able to link image maps to give the illusion of travelling through a space, and responsive sizing.
Features- Responsive image map resizing (included plugin)
- Preloading images included in the map (included plugin)
- Image animations when areas are hovered over
- Area maps changing the background and use map, giving the illusion of changing areas
- Last Updated: 7th August 2023
- Item Name: sc_imw
- Status: Complete
- Type: Widget
- Javascript: Required, noscript warning
- Files Included: HTML file, Javascript file, placeholder images
- Other Scripts Included: Yes
- Image Preloader Plugin
- Responsive Image Map Plugin
- Example: Example HTML page
- Download the Javascript, HTML example, and placeholder images files from the 'download' tab above. Add them to your neocities site and do not separate them into different folders.
- The following guide will work from the sc_imw_example.html file. If you wish to add it to your own pre-existing page, copy the following code and paste it between your <body> tags:
Reveal Code
                        <!-- Interactive Image Map Container -->

                        <div id="sc_imw_container">

                          <!-- Images for the Map -->

                          <img id="sc_imw_mappedImage" src="sc_imw_imgs/sc_imw_testingRoom1.png" usemap="#sc_imw_testingRoom1.png"  alt="Scribblemakes Code Interactive Image Map Widget">

                          <noscript>Javascript is disabled. Enable your Javascript to use the interactive map.</noscript>


                          <!-- First Map (Room 1) -->

                          <map name="sc_imw_testingRoom1.png">

                            <area shape="rect" coords="261,202,547,803"

                              onmouseenter="sc_imw_AreaHover('sc_imw_testingRoomHoverLeft.png')"

                              href=""

                              class="sc_imw_MapClass">

                            <area shape="rect" coords="1370,202,1658,803"

                              onmouseenter="sc_imw_AreaHover('sc_imw_testingRoomHoverRight.png')"

                              onclick="sc_imw_changeArea('sc_imw_testingRoom2.png')"

                              class="sc_imw_MapClass">

                          </map>


                          <!-- Second Map (Room 2) -->

                          <map name="sc_imw_testingRoom2.png">

                            <area shape="rect" coords="261,202,547,803"

                              onmouseenter="sc_imw_AreaHover('sc_imw_testingRoomHoverLeft.png')"

                              onclick="sc_imw_changeArea('sc_imw_testingRoom1.png')"

                              class="sc_imw_MapClass">

                            <area shape="rect" coords="820,226,1098,807"

                              onmouseenter="sc_imw_AreaHover('sc_imw_testingRoom2HoverDoor.png')"

                              href="https://scribblemakes.com/code/development#sc_imw"

                              class="sc_imw_MapClass">

                            <area shape="rect" coords="1370,202,1658,803"

                              onmouseenter="sc_imw_AreaHover('sc_imw_testingRoomHoverRight.png')"

                              href=""

                              class="sc_imw_MapClass">

                          </map>

                        </div>


                        <!-- Link and Button (optional)

                        <a id="sc_imw_preloadLink">This link text is replaced with sc_imw_impp_starterText if text is missing</a>

                        <button id="sc_imw_preloadButton">This button text is replaced with sc_imw_impp_starterText if text is missing</button>

                        -->


                        <!-- Script to set up images -->

                        <script src="scWidget_InteractiveImageMap.js" type="text/javascript"></script>

<script>sc_imw_Preload(["sc_imw_imgs/sc_imw_testingRoom1.png", "sc_imw_imgs/sc_imw_testingRoom2.png"]);</script> - If you're using your own page, make sure it's in the same folder as the .js file and images folder.
- When you view the HTML page you should now see the placeholder map and be able to interact with it. The rest of this guide will go over replacing the placeholder images with your own.
- Replace the starting image with your own
- Upload your new starting image into your images folder, where you can see the placeholder .png files, and then open the HTML file.
- All images will need to be kept in the same folder for your map. If you're using an image from another server: download it and upload it to your image map folder (by default this is "sc_imw_imgs", you can change it in the .js file).
- Find the main image tag (by default it has the "sc_imw_mappedImage" id) and change its src property to the image URL you want the map to start on. For example:
<img id="sc_imw_mappedImage" src="sc_imw_imgs/myFirstRoom.png" usemap="#sc_imw_testingRoom1.png" alt="Scribblemakes Code Interactive Image Map Widget"> - Change the main image's usemap property to the name of your image with a # in front of it.
<img id="sc_imw_mappedImage" src="sc_imw_imgs/myFirstRoom.png" usemap="#myFirstRoom.png" alt="Scribblemakes Code Interactive Image Map Widget">Scroll down to your first map and also change its name to your new image.<!-- First Map (Room 1) -->
<map name="myFirstRoom.png"> - Find the script at the bottom of the page and change the code to now load your new background image. To do this, replace the first string (inside the " ") in the array to your image URL:
<!-- Script to set up images -->
<script src="scWidget_InteractiveImageMap.js" type="text/javascript"></script>
<script>sc_imw_Preload(["sc_imw_imgs/myFirstRoom.png", "sc_imw_imgs/sc_imw_testingRoom2.png"]);</script> - If your new image is not 1920px by 1080px in size, you'll need to change some variables in the javascript file. Open 'scWidget_InteractiveImageMap.js' and scroll down to '// Responsive Image Maps Plugin Setup'. Change sc_imw_rimp_originalWidth and sc_imw_rimp_originalHeight to your image's width and height in pixels, respectively. For example, if your new image was 2000px tall and 1000px wide:
// Responsive Image Maps Plugin Setup
var sc_imw_rimp = true; // Set to false to deactivate the built-in Image Map Resizer
const sc_imw_rimp_originalWidth = 1000; // Width of the image without CSS styling (file dimensions, the size it was mapped at)
const sc_imw_rimp_originalHeight = 2000; // Height of the image without CSS styling (file dimensions, the size it was mapped at) - Your map will now start on your new image, and it will be loaded with the rest of the images.
- Add new clickable areas
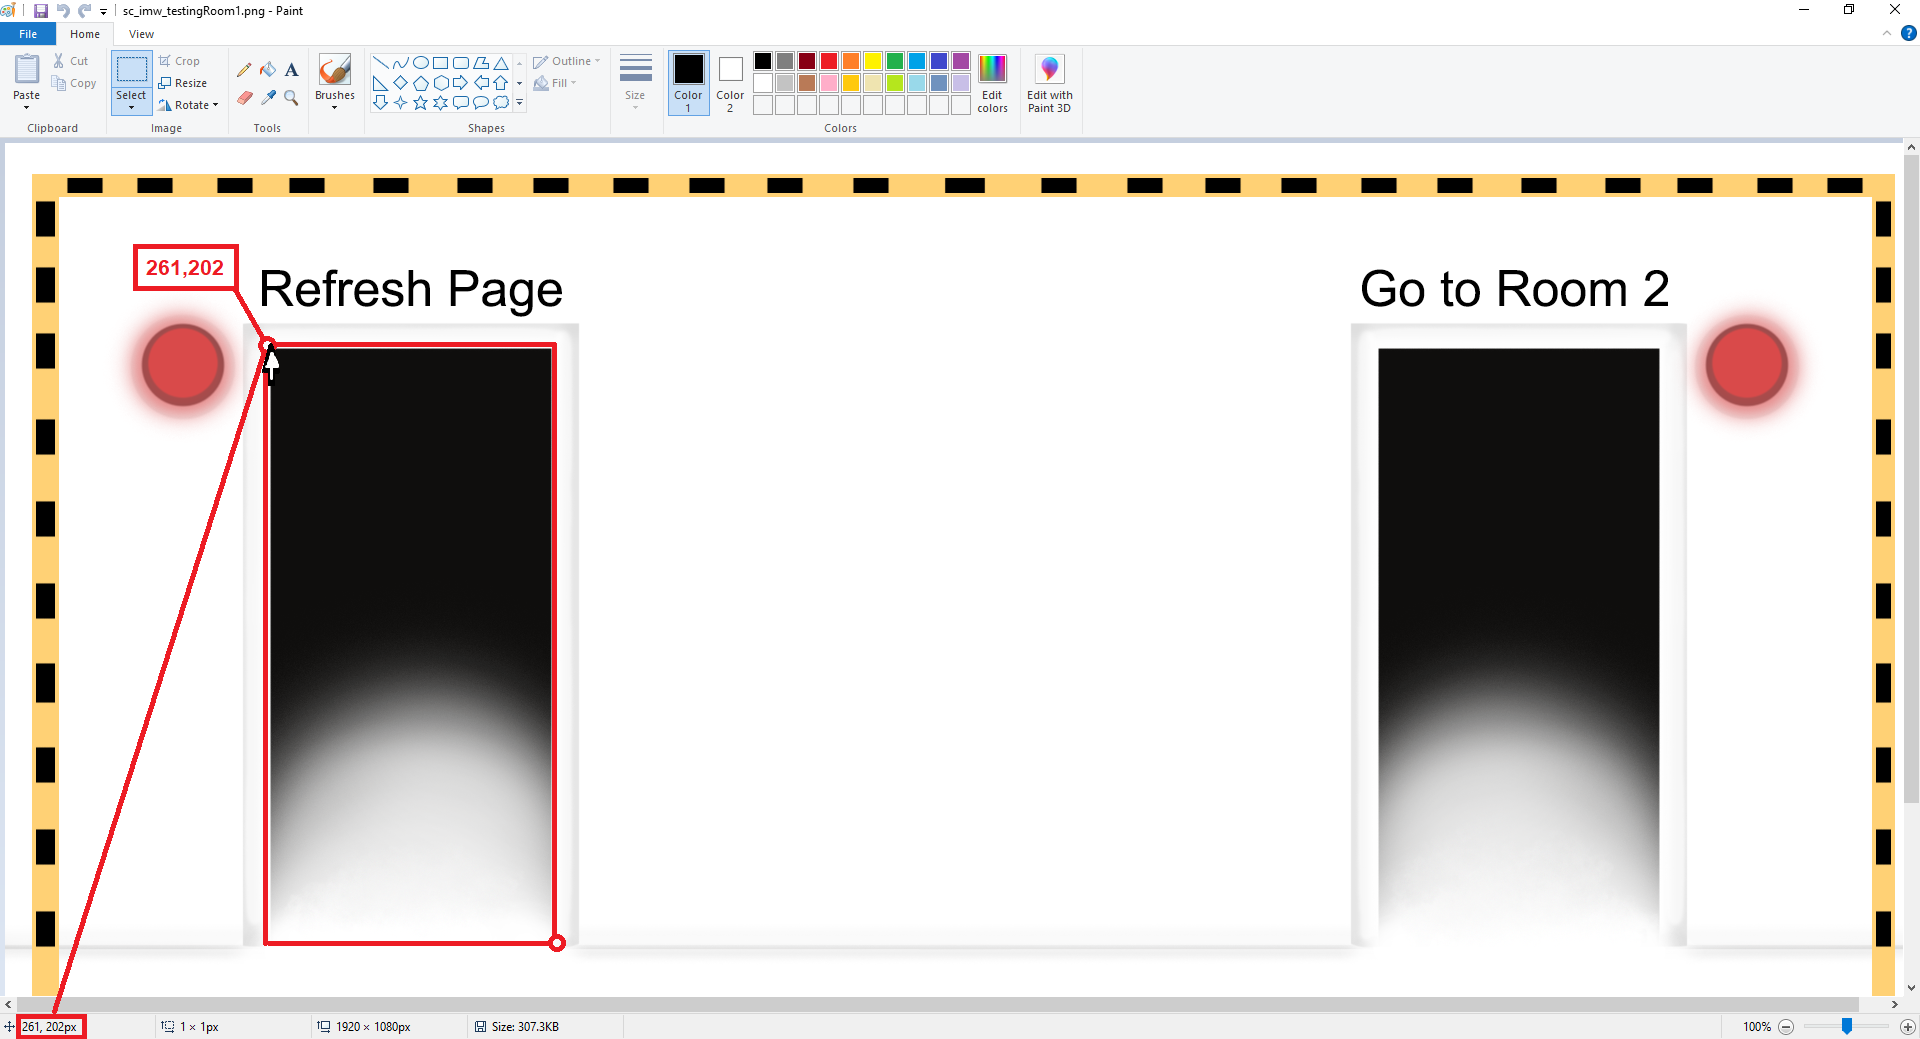
- Creating clickable areas with the Interactive Map Widget is the same as creating standard HTML image maps. You can read more about making standard HTML image maps here. To start, you'll need a program or site that allows you to see the x and y coordinates of your cursor on top of your image, such as the Paint program offered by Microsoft.
- Upload your image into the program or site and get the coordinates of where you want a space to be clickable. For this guide, the clickable space will be where the doors are. Since that's a rectangular shape, it will only need the top left and bottom right coordinates (which are 261x 202y and 547x 803y).
 Write down the coordinates you find for each clickable area, you'll be inputting them into your code later.
 - Return to your HTML document and delete both maps (not the image or outside the div), your map code should look like this:
<!-- First Map (Room 1) -->
<!-- Second Map (Room 2) --> - Add a map to both the first and second room sections. Your maps' names will need to be the file name of the room, for example: the first map name will be myFirstRoom.png based on the last section of this guide.
<!-- First Map (Room 1) -->
<map name="myFirstRoom.png">
</map>
<!-- Second Map (Room 2) -->
<map name="sc_imw_testingRoom2.png">
</map> - If you have a second image ready that you want to use, upload it to your image folder and rename the second map. Make sure the second image is the same size as your first image or the script will not work.
- Add your area shapes to your maps, including their shape, coords (which you wrote down earlier), and the class 'sc_imw_MapClass'. This guide will use the doors of the placeholder image as the clickable areas, which means room 1 will have two shapes and room 2 will have three.
<!-- First Map (Room 1) -->

                            <map name="myFirstRoom.png">

                               <area shape="rect" coords="261,202,547,803"

                                  class="sc_imw_MapClass">

                               <area shape="rect" coords="1370,202,1658,803"

                                  class="sc_imw_MapClass">

                            </map>


                            <!-- Second Map (Room 2) -->

                            <map name="sc_imw_testingRoom2.png">

                               <area shape="rect" coords="261,202,547,803"

                                  class="sc_imw_MapClass">

                               <area shape="rect" coords="820,226,1098,807"

                                  class="sc_imw_MapClass">

                               <area shape="rect" coords="1370,202,1658,803"

                                  class="sc_imw_MapClass">

</map> - Now you'll add the animations for when the clickable areas are hovered over. This is done by adding a new line to your areas that gives them a 'hover over' event, which then calls a function and the animation image you want to use.
<!-- First Map (Room 1) -->

                            <map name="myFirstRoom.png">

                               <area shape="rect" coords="261,202,547,803"

                                  onmouseenter="sc_imw_AreaHover('myFirstRoomAnim1.png')"

                                  class="sc_imw_MapClass">

                               <area shape="rect" coords="1370,202,1658,803"

                                  onmouseenter="sc_imw_AreaHover('myFirstRoomAnim2.png')"

                                  class="sc_imw_MapClass">

                            </map>


                            <!-- Second Map (Room 2) -->

                            <map name="myFirstRoom.png">

                               <area shape="rect" coords="261,202,547,803"

                                  onmouseenter="sc_imw_AreaHover('sc_imw_testingRoomHoverLeft.png')"

                                  class="sc_imw_MapClass">

                               <area shape="rect" coords="820,226,1098,807"

                                  onmouseenter="sc_imw_AreaHover('sc_imw_testingRoom2HoverDoor.png')"

                                  class="sc_imw_MapClass">

                               <area shape="rect" coords="1370,202,1658,803"

                                  onmouseenter="sc_imw_AreaHover('sc_imw_testingRoomHoverRight.png')"

                                 class="sc_imw_MapClass">

</map> - The function 'sc_imw_AreaHover' is given the image file you want to go on top of your background, such as 'myFirstRoomAnim1.png'. It's recommended to make these images transparent so they only cover the area you want animated, making it easier to add things to your background without needing to change every animation.
- These animations, and the background image, can be any file type (such as gifs and jpgs). However they ALL must be the same dimensions (for example: 1920px by 1080px).
- When you view your page it should now animate when you hover over your clickable areas. The last thing to do with them is to give them a function for when they're clicked on, such as changing to your second room or going to a new URL. This guide will start with adding the URL, which is done with href:
<!-- First Map (Room 1) -->

                            <map name="myFirstRoom.png">

                               <area shape="rect" coords="261,202,547,803"

                                  onmouseenter="sc_imw_AreaHover('myFirstRoomAnim1.png')"

                                  href=""

                                  class="sc_imw_MapClass">

                               <area shape="rect" coords="1370,202,1658,803"

                                  onmouseenter="sc_imw_AreaHover('myFirstRoomAnim2.png')"

                                  class="sc_imw_MapClass">

                            </map>


                            <!-- Second Map (Room 2) -->

                            <map name="sc_imw_testingRoom2.png">

                               <area shape="rect" coords="261,202,547,803"

                                  onmouseenter="sc_imw_AreaHover('sc_imw_testingRoomHoverLeft.png')"

                                  class="sc_imw_MapClass">

                               <area shape="rect" coords="820,226,1098,807"

                                  onmouseenter="sc_imw_AreaHover('sc_imw_testingRoom2HoverDoor.png')"

                                  href="https://scribblemakes.com/code/development#sc_imw"

                                  class="sc_imw_MapClass">

                               <area shape="rect" coords="1370,202,1658,803"

                                  onmouseenter="sc_imw_AreaHover('sc_imw_testingRoomHoverRight.png')"

                                  href=""

                                  class="sc_imw_MapClass">

</map> - If your clickable area should take you to another image, it will need an 'onclick' property that calls the 'sc_imw_changeArea' function. You'll need to give this function the name of the image / map you want it to go to:
<!-- First Map (Room 1) -->

                            <map name="myFirstRoom.png">

                               <area shape="rect" coords="261,202,547,803"

                                  onmouseenter="sc_imw_AreaHover('myFirstRoomAnim1.png')"

                                  href=""

                                  class="sc_imw_MapClass">

                               <area shape="rect" coords="1370,202,1658,803"

                                  onmouseenter="sc_imw_AreaHover('myFirstRoomAnim2.png')"

                                  onclick="sc_imw_changeArea('sc_imw_testingRoom2.png')"

                                  class="sc_imw_MapClass">

                            </map>


                            <!-- Second Map (Room 2) -->

                            <map name="sc_imw_testingRoom2.png">

                               <area shape="rect" coords="261,202,547,803"

                                  onmouseenter="sc_imw_AreaHover('sc_imw_testingRoomHoverLeft.png')"

                                  onclick="sc_imw_changeArea('myFirstRoom.png')"

                                  class="sc_imw_MapClass">

                               <area shape="rect" coords="820,226,1098,807"

                                  onmouseenter="sc_imw_AreaHover('sc_imw_testingRoom2HoverDoor.png')"

                                  href="https://scribblemakes.com/code/development#sc_imw"

                                  class="sc_imw_MapClass">

                               <area shape="rect" coords="1370,202,1658,803"

                                  onmouseenter="sc_imw_AreaHover('sc_imw_testingRoomHoverRight.png')"

                                  href=""

                                  class="sc_imw_MapClass">

</map> - Your clickable areas are now done. You can follow the same process to add new maps or areas for any images you add.
- Add new background images / rooms
- Upload your new background image to your images file, making sure it's the same size as your starting image.
- Open your HTML file and scroll to the bottom where you'll find '<!-- Script to set up images -->' and find the 'sc_imw_Preload' function. You'll need to add your new image into the array:
<!-- Script to set up images -->

                              <script src="scWidget_InteractiveImageMap.js" type="text/javascript"></script>

<script>sc_imw_Preload(["sc_imw_imgs/sc_imw_testingRoom1.png", "sc_imw_imgs/sc_imw_testingRoom2.png", "sc_imw_imgs/myNewRoom.png"]);</script> - If you're replacing the second placeholder image, remember to remove '"sc_imw_imgs/sc_imw_testingRoom2.png",' from the array and rename your second map.
- Repeat the instructions listed in step 4, this time using it to set up your new image's clickable areas.
- Your image map is now functional and using your own images. You can keep developing it to make a site map, a game, or anything else you can think of. If you'd like to customise it further in the .js file: scroll down inside the .js file until you see '// FILL IN ANY VARIABLES BELOW IF YOU WANT TO CHANGE THEM FROM THE DEFAULT'. You can customise your script from here if you plan to change your image folder or rename your image id. You can also customise the two included plugins to change their appearance, behaviour, and turn them off if needed.
- #sc_imw_container = Element holding the widget
- #sc_imw_preloadLink = Link used for preloading images if style is 'link'
- #sc_imw_preloadButton = Button used for preloading images if style is 'button'
- .sc_imw_impp_blackout = Element holding the preloading text for the 'blackout' style